
Mouse pointer, or mouse arrow also known as mouse cursor is a movable indicator on a computer screen, which repeats the actual movement of the mouse and helps the user to execute the computer command. Generally the default mouse pointer is pretty straight forward and it is shaped like an arrow or human hand, which changes according to where it is placed. For example when you hover the pointer over link or button it can start blinking, change the colour and etc. Personally I think that, mouse pointer is most important part of our computer and we should customize not only our mice, but also the look of our mouse pointer inside the mouse properties window.
In this guide I will be showing you exactly how to change your mouse cursor for Windows 7, Windows 8, Windows 8.1 and last but not least for Windows 10. This tutorial is equally helpful for all systems and provides step by step guide, on how to download custom cursors and customize without addition software.
Contents
Mouse Cursors For Windows
Windows operating system uses two different formats for dealing with mouse pointers, they are .CUR (cursor) and .ANI (animated cursors). As you can tell by the name, main difference between two is the type of mouse scheme. Animated cursors are based on Microsoft RIFF format and contain individual frames of the animation, that’s why .ANI files take up around 82KB space, while default mouse pointers only 1-6KB space on a hard drive. It’s worth to mention that despite the difference between file formats, they are all located in the same folder. The typical path for the cursors folder is “C:\Windows\Cursors” only difference is the actual drive letter where the Windows is installed, but in most cases it is local disk “C”. So now you can search for this folder using Windows Explorer’s address bar or start Menu.
Tip: Remember not to use final backslash after the word “cursor”, when you are searching for mouse pointer folder in start menu search bar. Otherwise you will get list of .CUR And .ANI files not the actual folder of mouse cursors. So next time you decide to add new cursor, remember to keep those files organized.
How to change your mouse cursor
The following guide is specifically created for Microsoft Windows systems and provides tutorial on how to change mouse pointers inside the windows machine. It’s worth mentioning that sometimes changing the default mouse pointer won’t affect some of your programs, because they have their own set of mouse pointers. For example: games, special programs and etc. In order to change mouse pointer, first you have to access the mouse properties window. Unfortunately, you have to use different techniques to access this option, but in this guide you will see most effective way to open mouse properties window, which will work on all windows systems if you want to change cursor on your PC.
In order to access the Mouse Properties window, first you have to open the Run command using the Hotkey windows key + R and then type “control /name Microsoft.Mouse” and the Mouse Properties windows should come up. Then you have to click the pointers and follow the rest of the tutorial on this guide.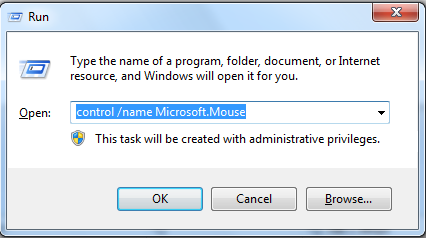
Tip: Remember to use space between “control” and “name” otherwise you won’t get any result.
Change single mouse cursor
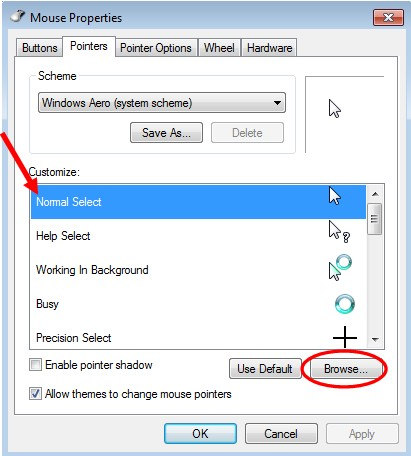
Once you open the Mouse Properties window you have to choose pointer and follow the further steps in order to change individual mouse cursor on your desktop.
- Select the Mouse pointer you want to change, in our case we want to change the normal select pointer.
- After you have selected the cursor, click the Browse button.
- The following button shows you the list of mouse pointers, which are installed inside your hard drive more specifically inside the “C:\Windows\Cursors” folder.
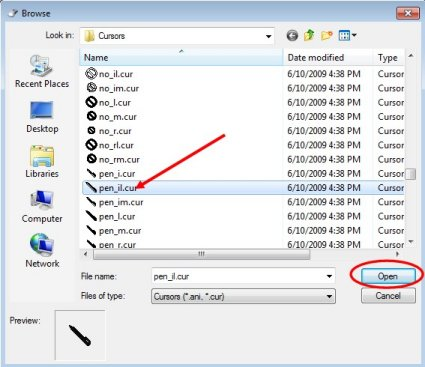
- Once you have selected the preferred mouse pointer, click “open” button. You can see the preview result of a new pointer in properties window.
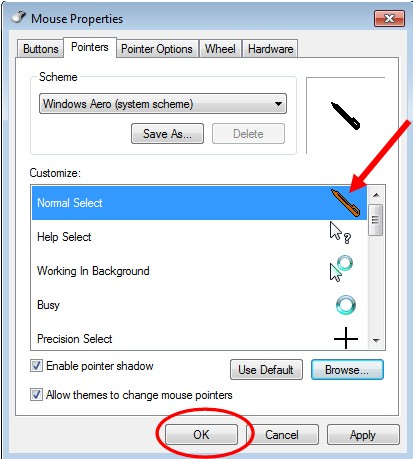
- After all, click ok and save the changes.
Changing multiple mouse cursors
Changing the Mouse scheme is extremely convenient if you want to change look all of your pointers with one click.
- Inside the mouse pointer window, click the Pointers tab.
- Click the scheme drop-down menu to see the different sets.
- Once you have picked your favorite scheme, you can see the preview inside the Customize window. If you don’t like the design, you can always change custom mouse cursors through mouse properties window.
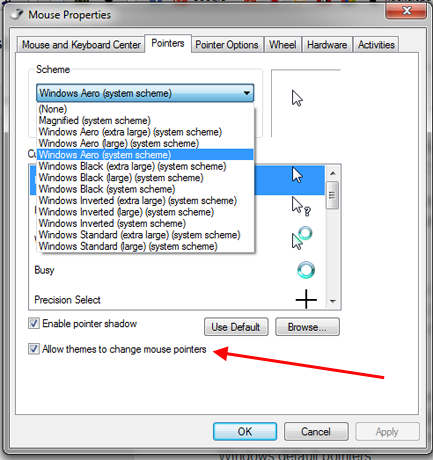
- After you scroll through and choose your favourite one, click Apply and OK to save the changes.
Different Types Of Mouse Cursor
In real world there are three scenarios which you might face, if you decide to change mouse cursor on your computer. Depending on custom mouse pointer, there might be new scheme, individual mouse cursor or a theme pack. This tutorial shows you detailed guide, on how to download and install the mouse pointers in each case. After you make up your mind which one you want to install, choose right method and follow the instructions.
Installing a theme pack
In most cases theme packs come with installer, which acts like an executable file and remotely runs the source file inside the mouse cursor directory folder: (“C:\Windows\Cursors”).
- Download the Cursor Theme Pack.
- Double-Click the installer file.
- The installer will do the rest on its own and activate new mouse pointer inside your operating system.
Installing a new scheme
Unlike new theme pack here we have an entire set of new cursors, which has to be installed at the same time. Mostly new schemes come with .inf file which enables us to execute all the pointers simultaneously and then choose one which you like most.
- Choose and download your favourite Mouse scheme.
- Extract the folder using your favourite open source utility for manipulating archives like: 7-Zip or WiNZip.
- Find the .inf file and click install.
- After you have installed new scheme, you can change custom mouse pointers from mouse property window.
Installing one or more cursors individually
At this stage you should know that installing mouse cursors individually is a slightly different process, because now we don’t have option of using .inf file, but it is not a problem unless you follow the instructions bellow.
- Download a single mouse pointer.
- Extract the folder using your favourite open source utility for manipulating archives like: 7-Zip or WiNZip.
- Find an appropriate file with .ANI or .CUR extension.
- Simply copy the cursor file using Hotkeys Ctrl + C
- Open the Windows Explorer, using Hotkeys Windows key + E
- Open the local disk where your operating system is installed and find the mouse cursor directory. On windows search for “C:\Windows\Cursors” (Usually Windows is installed on a local disk C)
- Paste selected .CUR or .ANI file inside this folder.
- Finally go to your mouse pointer management software and activate it from the system.
Helpful tips
Those tips are extremely helpful if you want to tweak the mouse setting and fully customize it.
Tip 1: Inside the Mouse Properties windows, choose the Pointer Options tab where you can adjust the pointer speed, visibility options and etc.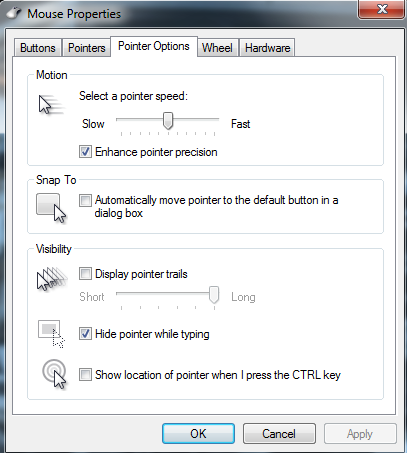
Tip 2: If you are planning to change each pointer individually or modify them it’s better to save cursors as a new scheme, to avoid any further problems.
Tip 3: Inside the mouse properties window choose the Wheel tab, to adjust the vertical and horizontal scrolling speed.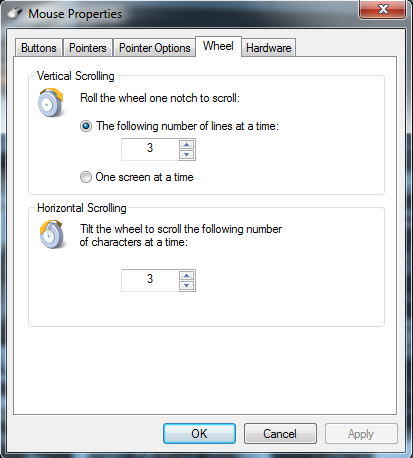
Mouse Cursor problems faced by Windows and Mac users
Having a Mac has become a style statement today and while it is extremely functional and professional to use, it is also quite complicated, especially for new users. First it takes days to understand how Mac works, and if it faces a problem, which very rarely happens, it becomes even harder to figure it out and then find a solution to it.
Out of a few issues that people who use Mac or Windows, face, one of them is your computer’s mouse cursor moving to another location all of a sudden. This is one issue that most of the users face, but only few actually know that it a genuine problem. While you are typing, all of a sudden, the cursor jumps to some random location on the same page. This results in all the text moving to that position. Also the few portions of the text document will get highlighted, and then get completely erased the next time you even try to make a keystroke. It is not possible for you to look at the screen every time you type a word, thus it takes four times the time it takes for the writer to complete a single sentence or a whole document.
If you too are facing such a problem with your Windows or MAC, here are a few causes that can help you analyze your mouse pointer issue.
-
There is a problem in your track pad setting
The problem in your mouse cursors can be related to your trackpad settings as well. To find out whether or not this is the cause, go into System Preferences in your PC. Here you have to select Trackpad, and then de-select the box for Trackpad Gestures. Check Ignore accidental trackpad input. By doing this, you inturn make your trackpad less sensitive to the input, which aids in solving the issue.
There is one more way in which you can resolve mouse pointer issue. Just attach a USB mouse to the system and use that instead of your touchpad. If your touchpad is the main culprit then after using a USB mouse your Mac or Windows will work just fine. Just make sure to select the Ignore touchpad When Mouse is Present under Trackpad Settings after connecting the USB.
-
Resetting your PRAM
PRAM is the parameter RAM, where your PC stores basic information, just so the user need not re-enter it every time they start up the computer. The basic information includes the date, time, etc and usually when this is incorrect it causes the computer to add differently. Resetting the PRAM information is the easiest and the smarter way of solving this issue. Follow the following steps to be trouble free. Shut down your computer and then, unplug it, remove the battery. Now replace the battery and re-attach the power cord. Now, turn on the computer. If by any chance, you hold these keys down, you will hear a soft voice. Keep pressing the key and voice stops completely.
-
There is a virus
The most common and obvious cause of your computer reacting weird it that it has infected a virus or malware. If you do, then mouse cursor problem is because of that. To not allow this to happen, first start by using a free trial of a program like Malwarebytes to see if there is something unwanted in your system. The anti-virus is extremely powerful to actually remove this stuff and make your PC safe.
-
Trackpad Misalignment
Apart from trackpad settings, there can be an issue in the trachpad as well. When the computer is too old and has been used roughly since years now, chances are that the touchpad has either lost its connectivity or is out of alignment. Through this, the trackpad becomes so sensitive that it starts working on its own or even stops completely. In order to solve this problem, you have to show it to someone much aware of it, otherwise if you decide to repair trackpad on your own there is risk of damaging the system.
Conclusion
I hope you enjoyed my guide and finally changed your default mouse pointer, with a new set of custom cursors. If you have any problems drop a comment and I will get back to you soon.


